Connect and Install
This is the first of three setup steps in Get Started with AI: connect Claude to your instance, then install the plugin marketplace.
Connect Claude to your instance
The recommended path is a single OAuth connector: configure it once in your instance, add it to claude.ai, and it becomes available everywhere your organization uses Claude -- chat, Cowork, and Claude Code. You set up the OAuth application members authenticate through, enable the MCP endpoint, and register the connector in claude.ai.
Agents who will use the connection need the MCP Access role; in a governed tenant, request and approve role grants through a User Access Request as described in Agent Roles.
1. Set up the Claude MCP OAuth application
The connector authenticates through an OAuth application named Claude MCP OAuth in your instance, which Stratus provisions on tenants as part of delivery -- check for it before creating one.
- Go to Configuration > Integrations > Halo API and open Applications.
- If Claude MCP OAuth already exists: open it and click Generate next to Client Secret to issue a fresh secret. Copy it immediately -- it is shown once, and generating a new secret stops the old one from working.
- If it does not exist, create it:
- Name it
Claude MCP OAuthand leave Active checked. - Set Authentication Method to Authorisation Code (Native Application).
- Under Client Secret, choose Use a client secret for the token request and Generate a secret. Note the Client ID -- it can change on first save, so re-check its value after saving.
- Set both Login Redirect URL and Logout Redirect URL to
https://claude.ai/api/mcp/auth_callback. - On the Permissions tab, grant only the permissions the connection requires.
- Name it
2. Enable the MCP endpoint
- Go to Configuration > AI and find the Halo MCP Server section.
- Turn on the Enable the MCP Endpoint setting (a beta feature). The MCP Server URL field shows your instance's endpoint --
https://<your instance>/api/mcp. This is the URL the Claude connector points at. - Optionally, customize which tools and functions the endpoint exposes in the list below the setting. If the section does not appear, select a Default AI Connection first -- the built-in default connection works if you have not configured a custom one.
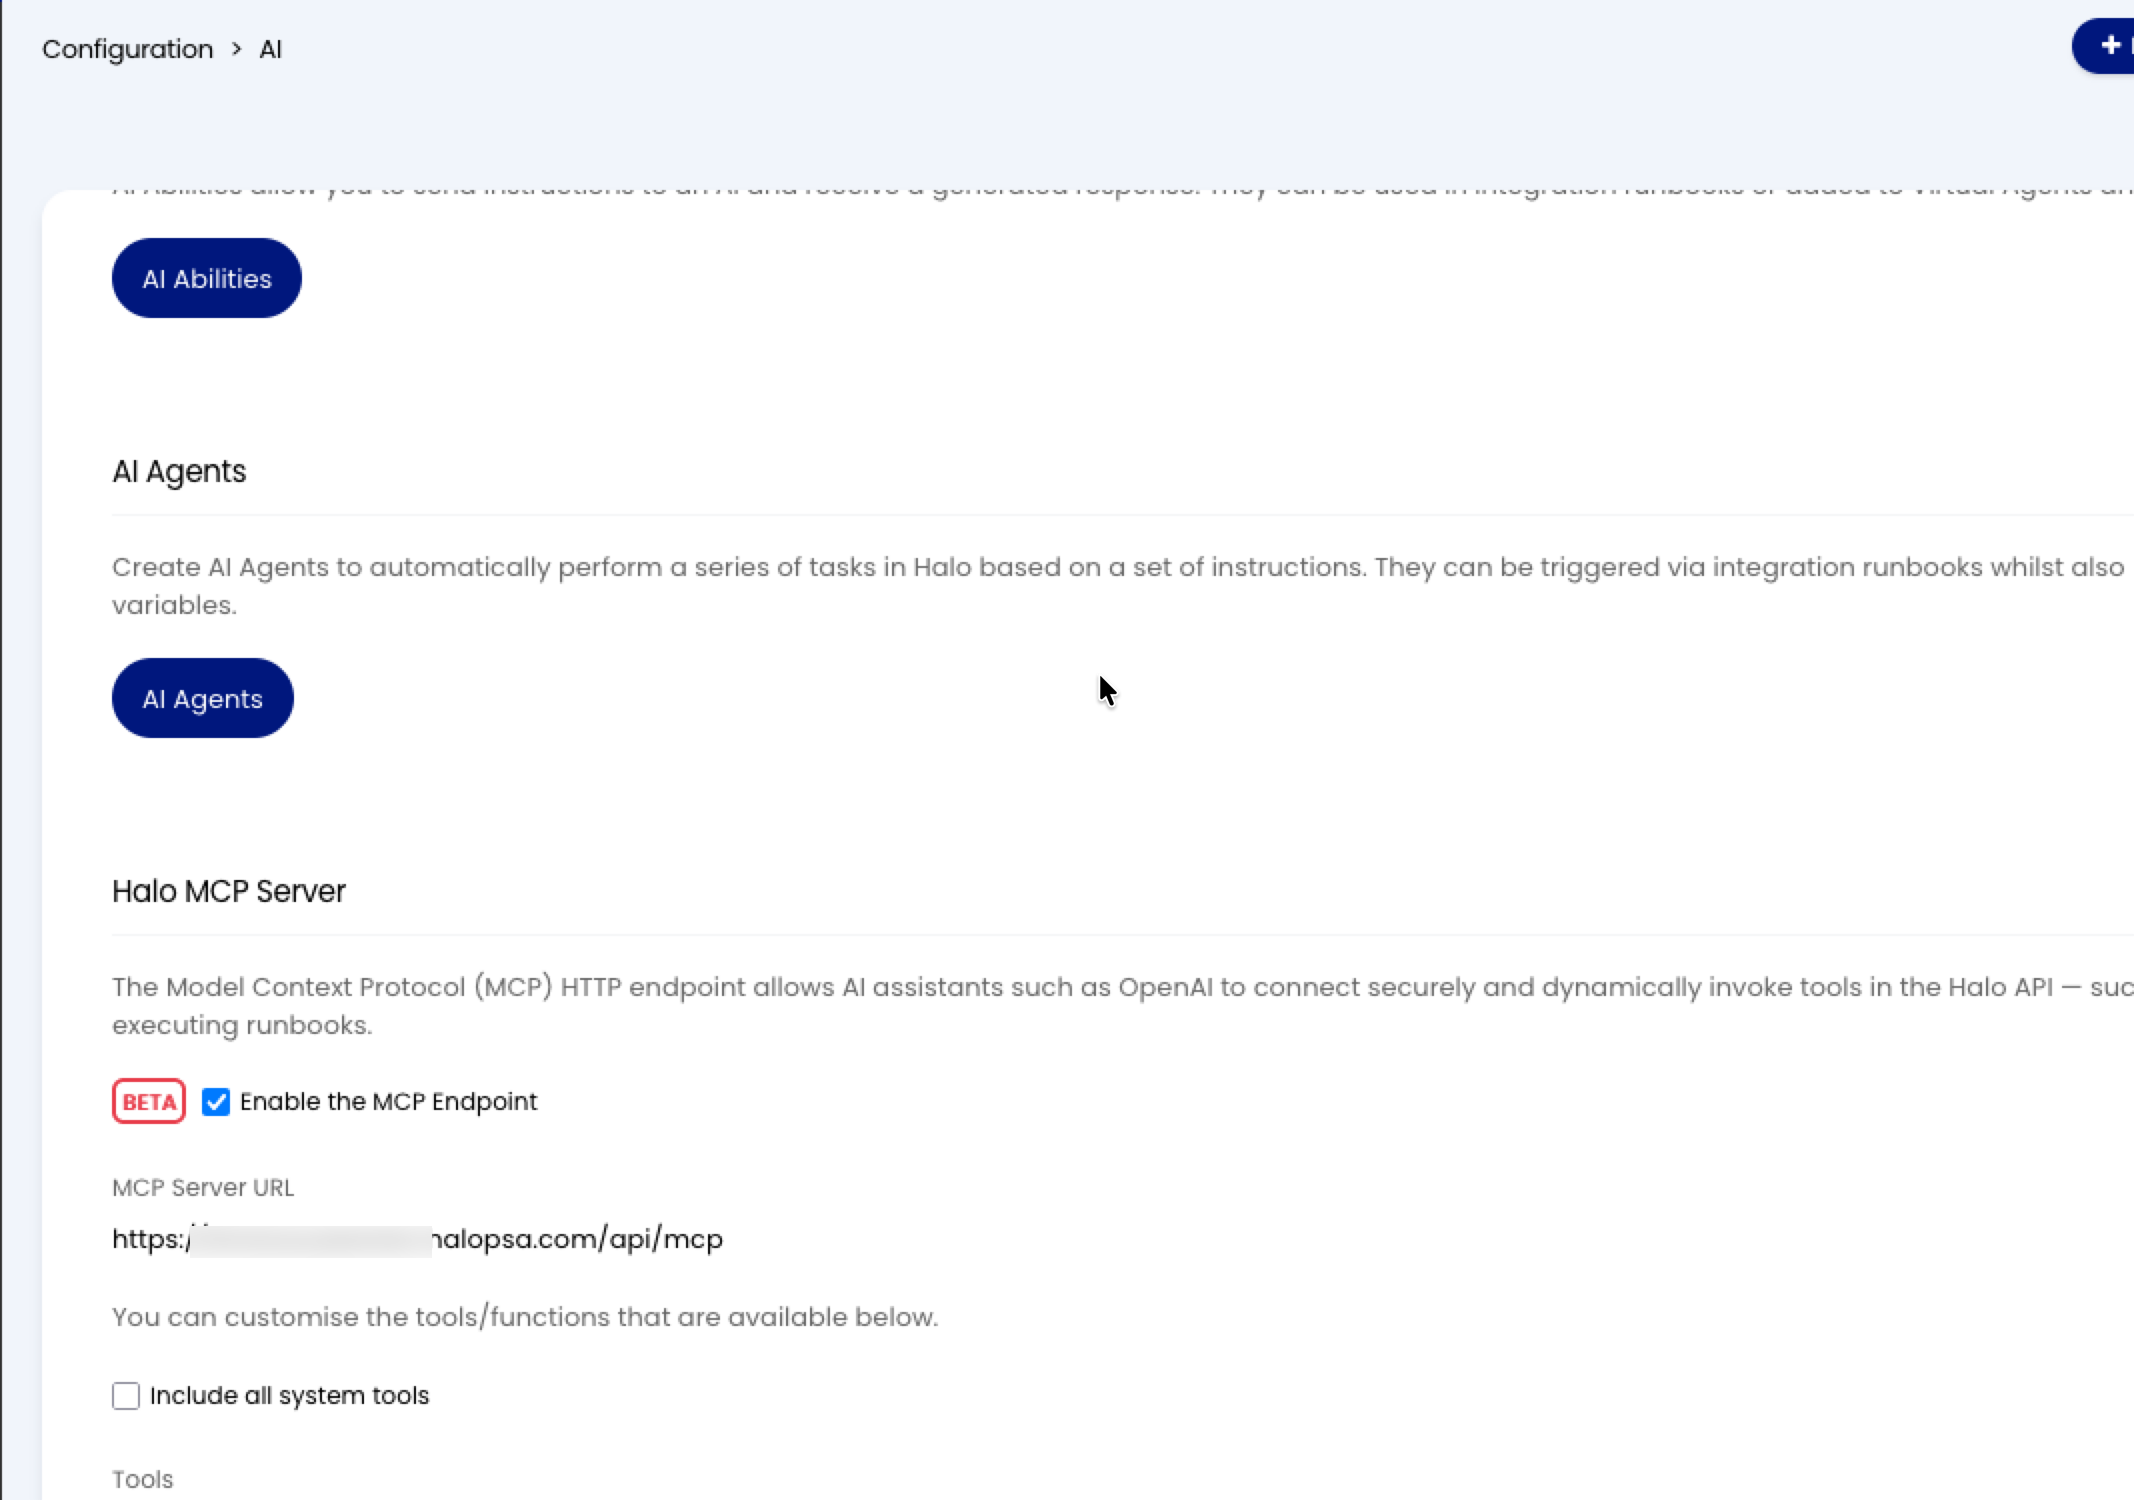
3. Add the connector in claude.ai
- An organization owner adds the MCP endpoint URL from step 2 as a custom connector under Settings > Connectors in claude.ai. The connector's name must start with
GRCITSM(for example,GRCITSMorGRCITSM Dev) -- the plugin's workflows discover the connection by that prefix, and a connector named anything else is not picked up. - Each member completes the OAuth sign-in against your instance the first time they use the connector, authenticating through the Claude MCP OAuth application with their own agent account -- everything they do with AI is attributed to them.
- Once added, the connector is available across Claude chat, Cowork, and Claude Code for members signed in to your organization -- no per-tool or per-machine configuration.
Hosted tenants: already configured for you
Your Stratus Cyber engagement team performs the instance-side configuration (steps 1-2) as part of tenant delivery for hosted tenants. Those steps matter mainly for on-prem deployments and for verifying or rotating the configuration.
Additional details
- Halo MCP server connection guide -- the platform vendor's reference for the MCP endpoint and AI connections
- Halo guides library -- the entry point to the vendor's full guide catalog
- Claude custom connectors -- Anthropic's reference for adding and managing connectors
Install the plugin marketplace in Claude
The Stratus GRCITSM marketplace carries the grcitsm-analyst plugin, distributed as a ZIP file. An organization owner uploads it once and distributes it to the whole organization.
Download the marketplace (ZIP)
Upload the plugin to your organization
- Confirm Cowork and Skills are enabled for your organization.
- Download the current marketplace ZIP, and check its SHA-256 against the one published beside it.
- Go to Organization settings > Plugins in claude.ai.
- Click Add plugins and choose Upload a file.
- The first time, choose Upload to a new marketplace and give the marketplace a name (for example,
Stratus GRCITSM). - Drag in the ZIP file (50 MB maximum) and click Upload.
To update later, upload the new release's ZIP to the same marketplace -- a plugin with the same name overwrites the previous version in place. Once a day at session start, the plugin compares itself with the version published on this site and tells you when a newer release is available.
Distribute it to members
Set the plugin's distribution state after upload:
| State | Behavior |
|---|---|
| Installed by default | Auto-enabled for all members; members can remove it |
| Required | Auto-enabled for all members; members cannot remove it |
| Available for install | Members opt in through the Browse plugins modal |
| Not available | Hidden from members |
Members find the plugin under Browse plugins in Claude, and it is available in chat (web and desktop) and Cowork. See Anthropic's Manage plugins for your organization for the full administration reference.
Claude Code
Claude Code loads the same ZIP file directly -- the archive is plugin-shaped (.claude-plugin/plugin.json at its root), so no extraction or marketplace registration is needed:
- Download the ZIP to your machine.
-
Launch Claude Code with the plugin loaded:
Pointing
--plugin-dirat the extracted folder works the same way.
The OAuth connector from Connect Claude to your instance is already available -- connectors added in claude.ai carry over to Claude Code for members signed in to your organization. Two practices are worth adopting in each working project:
- Run
/grcitsm-analyst:setuponce per project. It verifies the connection, reports anything missing, and scaffolds the working directories the plugin's workflows use. Re-run it after plugin updates. - Let reads run freely, prompt on every write. The marketplace's
SETUP.mdincludes a recommended permission block that allowlists read operations and forces a yes/no prompt on every operation that changes a record. Your tenant is a live system of record; this is the posture we recommend for it.
Next: Onboard Your System